Testing General Relativity
On May 29, 1919, Einstein’s four-year-old Theory of General Relativity was put to its first test during a total solar eclipse. By measuring how the images of stars shift when the sun is close-by, and with a lot of care, you might be able to repeat this famous test from nearly 100 years ago.
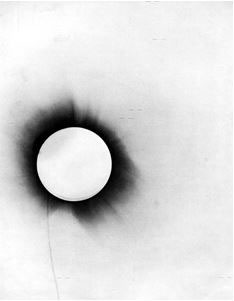
Eddington photo of 1919 eclipse for testing general relativity
Credit: Philosophical Transactions of the Royal Society of London. (1920)
Credit: Philosophical Transactions of the Royal Society of London. (1920)
For the 1919 eclipse, only a few stars (identified by the marks in the photo shown here) were visible on the photograph through the glare of the bright solar corona. The photo was large enough to cover both the eclipsed solar disk and the surrounding stars within 1.5 degrees of the sun. Even so, the measurement was at the very limit of what could be done given atmospheric distortion, star twinkling, and the unfavorable scale of the image for making such a precise measurement.
What is General Relativity?
Einstein’s theory proposes that gravity is not an actual force, but is instead a geometric distortion of spacetime not predicted by ordinary Newtonian physics. The more mass you have to produce the gravity in a body, the more distortion you get. This distortion changes the trajectories of objects moving through space, and even the paths of light rays, as they passes close-by the massive body. Even so, this effect is very feeble for an object as massive as our own sun, so it takes enormous care to even detect that it is occurring!
General Relativity predicts how much of this bending of light you should see given the mass of the object. Called ‘gravitational lensing’ it has been detected on the cosmological scale as entire clusters of galaxies distort the light from more distant galaxies behind them as this image from the Hubble Space Telescope shows.
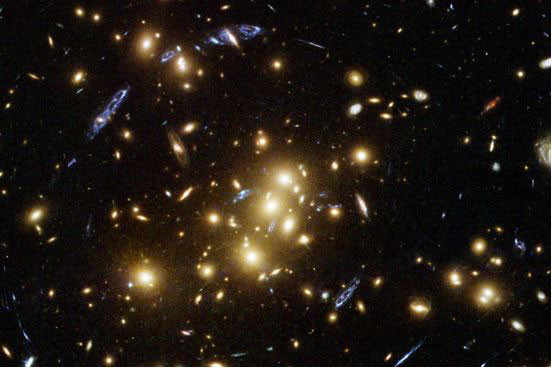
The blue objects are the image of a single, more distant, spiral galaxy that has been lensed by the multiple gravitational fields in the foreground cluster of galaxies. The cluster, called CL0024 1654, is located 4 billion light years away towards the constellation Pisces.
Einstein published his theory and predictions in 1915, and in 1919 the British physicist Sir Arthur Eddington took advantage of a total solar eclipse to attempt to detect the shifting images of stars near the limb of the sun. The problem was that during totality the sky does not get perfectly dark, and only a handful of stars were visible near the sun from which to make the measurement.
The basic idea is that you have to compare the positions of the stars before the sun arrives at its sky position at totality, and during the eclipse when the sun is present. The star images should appear to shift outwards from their normal sky position, but the amount is very slight and hard to measure. It amounts to only about an astronomical ‘second of angular arc’ or 1/3600 of a degree. The entire diameter of the sun is about 1800 arcseconds to give you a sense of scale. Also, stars twinkle and this smears out the image of a star over a scale of about an arcsecond as well.

Gravity distorts space near a massive object
Credit: NASA/ESA
Credit: NASA/ESA
So, how do we do it?
The precise formula for the starlight deflection is given by
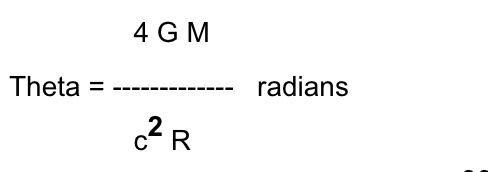
where for the sun we have M = 2x1030 kg, G is the constant of gravity of 6.67x10⁻¹¹, c is the speed of light 3x10⁸ meters/sec, and R is the distance between the light ray and the center of the sun in meters. If we plug-in the numbers and use the fact that 1 radian = 206265 arcseconds, we get for a radius of the sun of R = 6.9x10⁸ meters,
Theta = 206265 (4)(6.67x10⁻¹¹)(2x1030)/(3x108)2 (6.9x10⁸) = 1.75 arcseconds.
In fact, as viewed from Earth, if we use the observed radius of the sun as a unit of measure, as we double the distance of the star from the center of the sun, the deflection decreases by ½. At three times the sun’s radius, the deflection is 1/3 as large or 0.6 arcseconds. What helps with the observation is that the deflection only occurs along the line connecting the star with the center of the sun. There is no ‘sideways’ component to the effect for a point-source like a star.
So to measure the deflection of the star’s images due to relativity, we just need to compare the positions of stars far from the disk of the sun at totality, with the positions of the target stars closest to the sun at the time of totality. The farther-away stars should not change their positions by very much compared to the close-in target stars. These more-distant stars will then will serve as a frame of reference for the undisturbed geometry of space near the sun.
What will the sky surrounding the eclipse look like at the time of totality? Will there be many stars close to the sun that you can measure? This will determine whether you have enough star deflection measurements from which to detect the shift! Here is what the sky will look like near the sun at totality, for the sun located at Right Ascension 10hours 03minutes and Declination +11degrees 56minutes in the constellation Leo. The viewing location for the simulated sky scene image is near Carbondale, IL. (Credit: TheSky software).

The eclipse will take place not far from the bright star Regulus in the constellation Leo. As you can see from this figure, there are quite a few stars near the limb of the sun, but these stars are between magnitudes of +7 and +10. This means they are between 3 and 40 times fainter than the faintest naked-eye stars you can easily see at night from a clear location. Only Regulus will be easily seen during totality without a telescope, but at its distance from the sun, which amounts to a projected distance of 5.3 solar radii, its image will only shift by about 1.75/5.3 = 1/3 arcseconds. The many fainter stars such as HIP49158 will show a much larger deflection of over 1 arcsecond, but the challenge is that these faint stars may be completely lost in the glare of the solar corona!
The Setup.
This experiment will require a telescopic photograph to detect and measure enough stars. Only with a telescope will you be able to detect the faint stars, and have a large enough magnification across the image so that you can make measurements near the required limit of 1 arcsecond.
Taking photographs through a telescope is a significant level of difficulty and makes this a very hard project for the amateur astronomer who is not skilled with these techniques. The easiest method is to take a digital photograph of the star field near the sun so that the photograph captures stars as close to the solar limb as possible, but also captures images of stars at least three or four times farther from the center of the sun compared to the solar radius. These distant stars like Regulus will be so far from the sun’s limb that their positions will not change by very much (0.5 arcseconds or less) compared to the stars closer to the limb (shifts of 1 arcsecond or more). We can then make a ‘differential’ measurement of the gravitational deflection.
How to detect the shift.
To do this, you will need to take the photo through a telescope. Taking an ordinary camera photo with a regular camera telephoto lens will not work because the size of the solar disk is so small in a typical ‘beauty’ shot that it will not have the resolution required to detect enough stars and see the shift.
Make sure you take at least a few images of the eclipsed sun while you are photographing the star field. Ideally, the width of the star field you photograph should span about 3 to 5 times the solar radius. You will have to select a telescope and eyepiece combination that allows for this level of field coverage and magnification.
You will need to test-out your method long in advance of the eclipse, preferably by photographing the star field near Regulus during the weeks before the eclipse. For your telescope-camera combination, find a magnification that lets you capture a digital image about three degrees across. During the eclipse, you will have to make many short-exposure images, but not so long that the corona burns out the entire image field. Experiment with your exposures until you can just capture enough of the fainter stars near 8th magnitude to make at least three or four measurements. Because the sky brightness resembles the twilight sky just after sunset, you might want to try photographing faint stars in the twilight sky to see what kinds of exposure times you need. You might also experiment using filters that reduce skyglow.The eclipse only lasts 2.6 minutes so you can use this time to make 5 or more exposures of 30 seconds or longer so long as the corona light is not a problem. Ideally, you would like ten images that you can measure to improve your estimate of the average positions of the reference and target stars.
For best results, you need the photograph to have a resolution of about 1 arcsecond per pixel because the effect you are trying to measure is not much more than this under ideal conditions. That means the sun will appear to have a diameter of 1800 pixels in the image. That also means that for most megapixel-format cameras, you may not be able to capture images of distant reference stars if they are more than a few solar radii from the center of the sun and keep the image scale high enough to detect this deflection for the inner-most stars. Also, the solar corona will be bright enough that most faint stars will not be visible through the diffuse coronal light nearest the solar limb so you will have to use only bright stars, which are generally fewer in number.
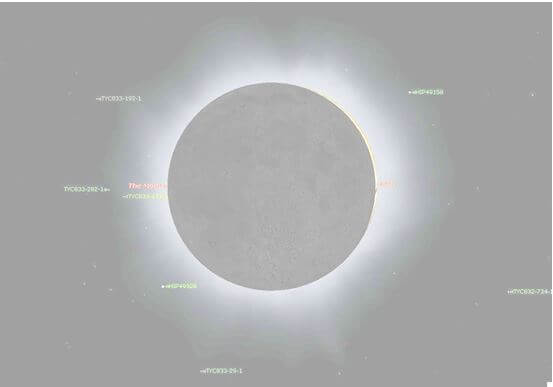
Here is a close-up of the field near the eclipse that you will see through your telescope adjusted so that the scale of the image allows you to measure the arcsecond-sized shift in the star images. The two brightest stars in the field are HIP-49158 (+7.8) and HIP-49328 (+7.1) which are seventh-magnitude stars. The rest are unusable faint stars that have magnitudes between +10 and +11 that will most certainly be lost in the glare of the corona.
If this image were taken with a megapixel camera like a Nikon D3000, it would have an image format of 3800x2600 pixels, so at this scale the resolution would be 4900 arcseconds/3800 pixels = 1.3 arcseconds/pixel. Since near the sun’s limb the shift will be about 1.75 arcseconds, the star image will appear to shift away from the sun by just one pixel!
One way to confirm Einstein’s prediction without any calculations is to superimpose the image of the starfield with NO sun, on top of the starfield image taken during the eclipse. Line up the reference stars so that their images overlap, and look at the stars nearest the sun. Those close-in stars may show some slight position changes away from the sun’s center, which is the effect you are looking for. To actually measure how much shift occurred compared to Einstein’s prediction will take much more careful work!
At least in principal, once you have the photograph, you need to measure the positions of the available stars in terms of their pixel locations. Usually you can import images into programs such as Photoshop, use the cursor to center on a star image and read-out its x and y location. Because the amount of the deflection depends only on the radial distance from the center of the sun, you need to keep track of how far the target star was from the center of the sun at its closest point. That means it will be convenient to line up the short edge of the image you take with the solar limb so you can use this edge as a distance reference point when you measure the deflections.
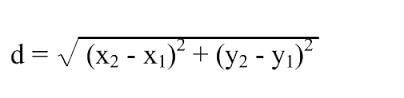
For each target star closest to the solar limb, measure its XY pixel location. Then determine its distance from as many other distant stars in the image as you can to form a grid work of relative measurements between the distant, fixed reference stars and the one in which you hope to detect a deflection. The more of these distant reference stars you have, the more precisely you can establish the relative position of the target star near the solar limb. The distance between two pixels is given by the Pythagorean formula where x1 and y1 is the x and y pixel address for Star 1 and x2 and y2 are the x and y pixel address for Star 2. First measure the distance of the star from your reference edge where the sun’s limb would be, then determine as many distances between your target star position and the distant reference star positions.

Here’s an example of what this measuring framework would look like. The distances D1, D2 and D3 establish how far the Target star is from these reference stars, and D4, D5 and D6 establish how much the reference stars move before and after the eclipse. Hopefully, the stars A, B and C are far enough away from the Target star that there is little distortion (change in their relative distances). The farther the target star is from the center of the sun, the less deflection you will be able to see.
Once you have made these measurements on as many limb stars as you can detect, you now need to make a measurement of where these target stars are when the sun is not there. To do this, photograph the same star field at night and repeat the relative measurements again to get the position of your target stars when the sun is not there.
For each distance measurement, subtract the corresponding eclipse and non-eclipse measurements you made to determine differences between the distorted and undistorted views. Average these reference star numbers together for each target star to get the average difference for that target star. Also calculate the root-mean-square or ‘rms’ of the average distances for each Target star so keep track of how large the random error limit is. Your goal is to get this below one arcsecond so that you can detect the deflection with statistical confidence.
With any luck, you should be able to detect how the reference star distances to the target stars have changed slightly. The ‘rms’ number (related to the standard deviation of the sample measurements) you calculated will tell you whether you succeeded or not. If the average deflection you measured was 2 to 3 times the calculated rms of the data, you have probably seen evidence for the gravitational deflection of starlight! But don’t be discouraged if the answer you get is zero. This is a very hard measurement to make, and the effort is worth more than the final answer! In fact, all you may be able to determine is that there was some slight difference in the star positions and not be able to actually measure how much it was in arcseconds. For it to be a true gravitational displacement, the shift you detect can only occur along the line between each star and the center of the sun. Any shifts you see that are not along this ‘radial’ line have nothing to do with the distortion of space but are a measure of how the images of the star shifts as it ‘twinkles’. You can minimize this effect by taking several images in rapid succession and determining their average positions.
Amateur astronomers are, in fact, gearing up to make this very difficult, but not impossible, gravitational deflection observation. Here is an article in Sky and Telescope magazine by Donald Bruns that describes his preparations for making this measurement. http://www.skyandtelescope.com/sky-and-telescope-magazine/beyond-the-printed-page/my-do-it-yourself-relativity-test/